AgentSEO Documentation
Welcome to AgentSEO, your Multi-Tenant Enterprise AI SEO SaaS platform.
As the SaaS Owner, this advanced, autonomous AI-powered platform provides you with a robust multi-tenant architecture designed to handle SEO, content creation, and business management workflows at scale for both your internal operations and your paying customers (tenants).
This documentation will guide you through installing the application on your own server, configuring the necessary AI API keys, managing users, and customizing your white-label branding.
2. Database Setup
⚠️ CRITICAL: PostgreSQL Required
AgentSEO requires a PostgreSQL database to support advanced JSON fields and vector scaling. MySQL is NOT supported. If your shared host only provides MySQL, you must use an external provider like Supabase or Neon.tech.
⚠️ CRITICAL: Master Key Security
Your APP_MASTER_KEY is used to encrypt all user API keys and WordPress passwords. If you lose or change this key after installation, all connected integrations will be permanently locked and undecryptable. Back it up safely.
AgentSEO requires a PostgreSQL database to store your business data, articles, users, and agent configurations securely.
Option A: cPanel PostgreSQL
If your hosting provider supports PostgreSQL natively in cPanel, you can create a new database and user directly from the "PostgreSQL Databases" section in cPanel. Note the database name, username, and password.
Option B: External Managed Database (Recommended)
If your host only provides MySQL, or if you prefer a dedicated database service, we highly recommend using a free or paid external PostgreSQL provider such as:
- Supabase (Free tier available)
- Neon.tech (Free tier available)
- Render
Regardless of the method you choose, you must obtain a DATABASE_URL connection string. It will look something like this:
postgres://username:password@hostname.com:5432/databasename
3. Installation (VPS/Ubuntu - Recommended)
Why VPS? AgentSEO relies on complex background tasks and autonomous AI agents. We highly recommend using a VPS (Virtual Private Server) as shared hosting environments often kill long-running processes or severely limit resources. In the near future, we will provide a one-click deployment for platforms like DigitalOcean.
For advanced users installing on an unmanaged VPS (Ubuntu 22.04/24.04), follow these CLI steps.
- Prerequisites: Ensure Node.js (v20+) and PM2 are installed.
- Extract Files: Upload and unzip the project files into your desired directory (e.g.,
/var/www/agentseo). - Install Dependencies:
cd /var/www/agentseo pnpm install - Configure Environment: Create a
.envfile:
Fill in the required variables (cp .env.example .env # Edit the .env file with your preferred editorDATABASE_URL,APP_MASTER_KEY,CRON_SECRET,APP_URL). Remember thatAPP_MASTER_KEYmust be at least 32 characters. - Build the App:
pnpm run build - Start with PM2:
pm2 start pnpm --name "agentseo" -- start
pm2 save
pm2 startup
Remember to visit https://your-domain.com/setup to run the database migrations!
4. Installation (cPanel - Shared Hosting)
While a VPS is recommended, AgentSEO can run on a standard cPanel shared hosting environment if your provider allows background tasks.
- Upload and Extract: Upload the AgentSEO zip file to your chosen directory (e.g.,
public_html/agentseo) via cPanel File Manager and extract it. - Setup Node.js App: In cPanel, locate the "Setup Node.js App" icon under the Software section.
- Configure App:
- Node.js Version: Select 20.x or higher.
- Application Mode: Production
- Application Root: The folder where you extracted the files (e.g.,
public_html/agentseo). - Application URL: The domain/subdomain where the app will be accessible.
- Application Startup File:
server.js
- Environment Variables: Scroll down to the Environment Variables section and add the following strictly required variables:
DATABASE_URL: Your PostgreSQL connection string (from Step 2).APP_MASTER_KEY: A secure random string. Must be exactly 32 characters or longer.CRON_SECRET: A secure random string used to protect your automated cron jobs.NEXT_PUBLIC_APP_URL(orAPP_URL): Your full application URL (e.g.,https://yourdomain.com).NODE_ENV: Set toproduction.
- Install & Build: Click the Run NPM Install button. Once complete, find the option to run a custom script and execute
npm run build. - Start App: Click the Start App button at the top of the Node.js setup page.
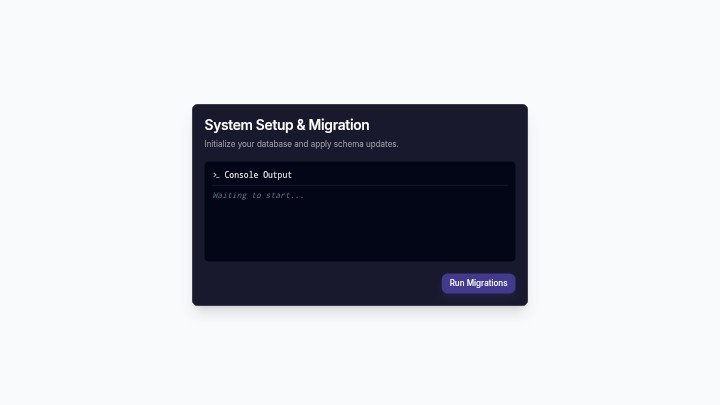
Crucial Step: Initialize Database
Once the app is running, you MUST navigate to https://your-domain.com/setup in your browser. This will run the database migrations and initialize the schema required for the app to function.
5. Initial Setup
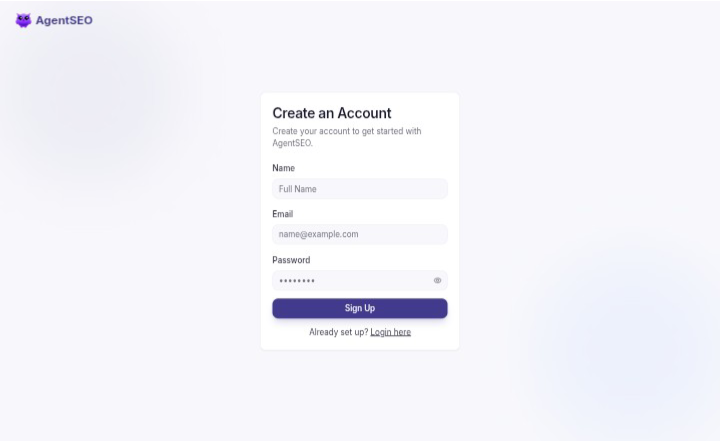
After your database is migrated, the next step is to create your master administrator account.
Navigate to /register on your domain to create your login credentials. This first user automatically becomes the system owner with admin privileges.
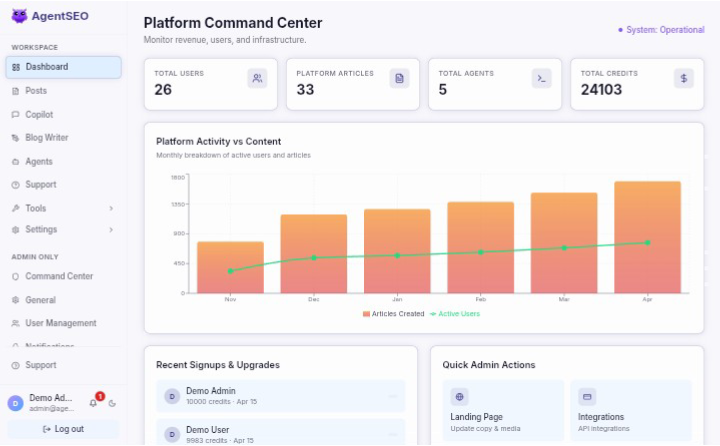
Once logged in, you will arrive at the main AgentSEO dashboard, your central hub for operations.
6. Settings: AI Brain & General Configuration
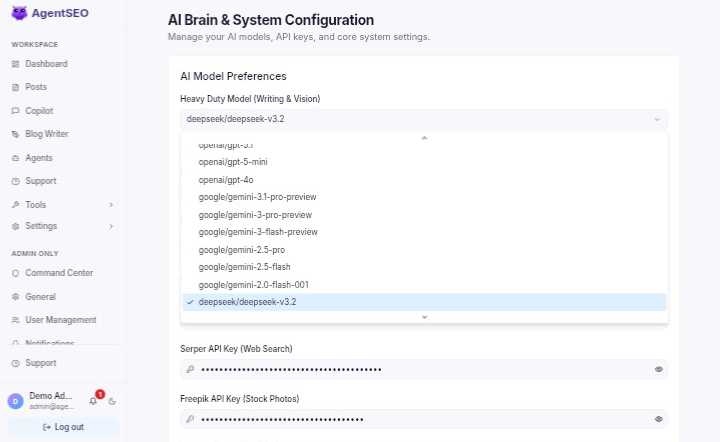
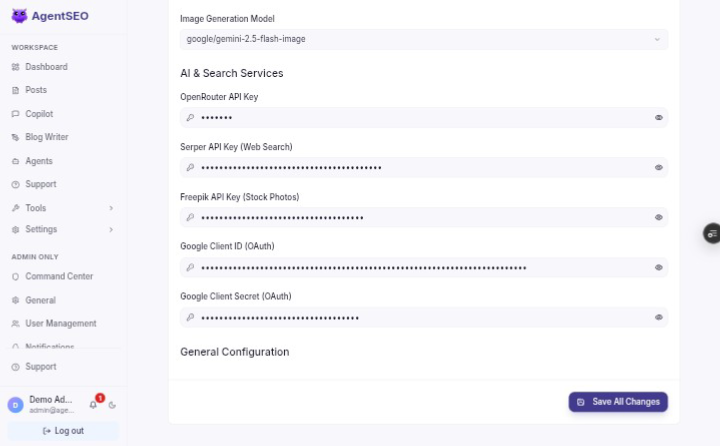
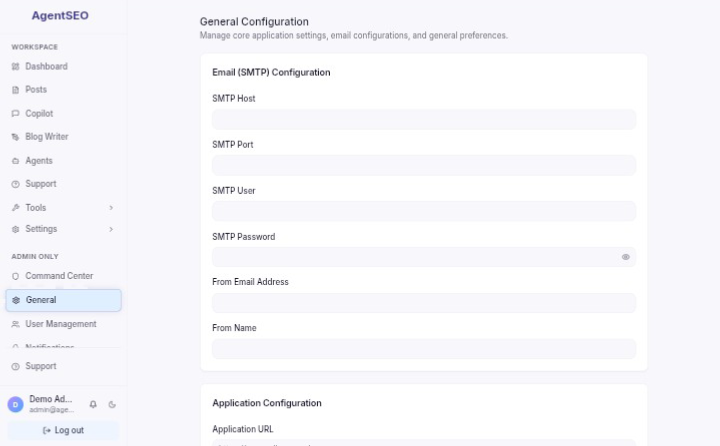
As the SaaS Owner, navigate to Settings > AI Brain to configure global AI models and APIs (OpenRouter, Google, Freepik). Navigate to Settings > General to configure your application URL, SMTP Email settings, and Image Storage Configuration. You can configure global Copilot settings under Settings > Copilot Setup. These API keys and settings apply platform-wide for all your users.
Selecting AI Models
You can choose different AI models for various tasks globally:
- Heavy Duty Model (Writing & Vision): Used for complex reasoning and deep research.
- Default Model (Strategy, Outlines, SEO): Used for standard generation and everyday tasks.
- Image Generation Model: Used for generating AI images.
Google OAuth 2.0 (For GA4/GSC Integrations)
To allow your users to connect Google Analytics and Google Search Console securely, you must configure a Google Cloud Project with OAuth 2.0 Credentials.
- Go to the Google Cloud Console and create a new project.
- Navigate to APIs & Services > Library. Enable the Google Analytics Data API and Google Search Console API.
- Navigate to APIs & Services > OAuth consent screen. Select External, fill out the App Information, and under Test Users, add your own email address so you can test it (or publish the app to Production).
- Go to APIs & Services > Credentials and click Create Credentials > OAuth client ID.
- Select Web application as the Application type.
- Under Authorized redirect URIs, explicitly add:
https://[your-domain]/api/auth/google/callback. - Copy the generated Client ID and Client Secret.
- Paste these values into the Settings > AI Brain panel under the Google Client ID and Secret fields.
API Keys & SMTP Configuration
You will also need to configure OpenRouter API Key, Serper API Key (Web Search), Freepik API Key (Stock Photos), and SMTP Settings (Host, Port, User, Password, From Address).
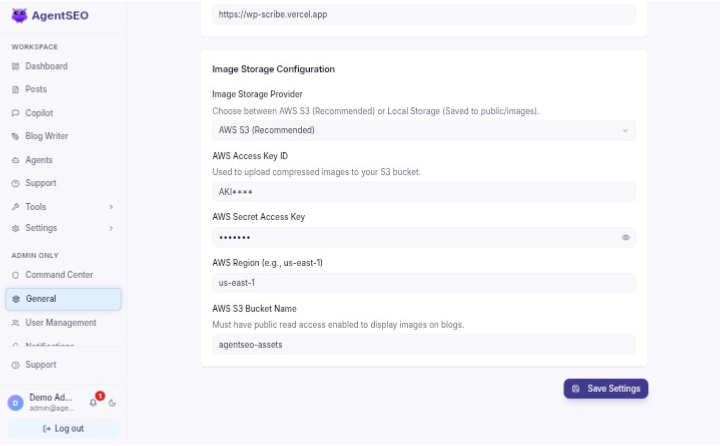
AWS S3 Image Storage
Serverless Deployments (Vercel/Netlify)
If you deploy AgentSEO to a serverless environment like Vercel, the local file system is read-only. You MUST configure AWS S3 storage here, otherwise AI-generated images will not be saved.
If you prefer storing user-generated images on Amazon S3 instead of local storage, configure the Image Storage Provider to AWS S3, and enter the AWS Region, AWS Access Key ID, AWS Secret Access Key, and AWS S3 Bucket Name fields.
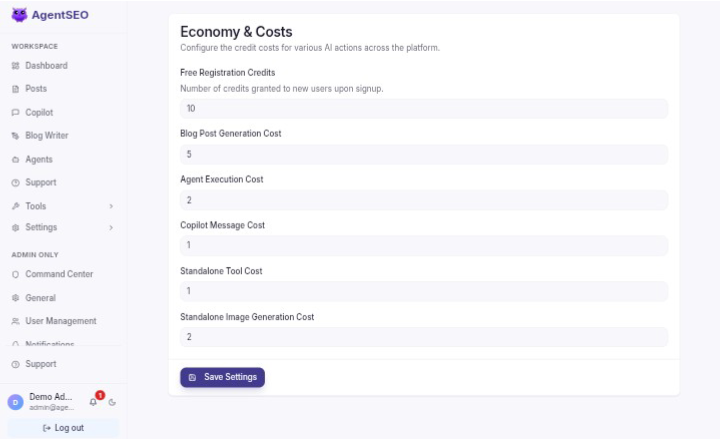
7. Settings: Economy & Costs
Navigate to Settings > Economy. AgentSEO features a flexible credit-based economy. Here, you define how many credits various actions cost across your multi-tenant SaaS platform.
You can define the specific credit cost for:
- Blog Post Generation Cost
- Agent Execution Cost
- Copilot Message Cost
- Standalone Tool Cost
- Standalone Image Generation Cost
This allows you to manage overhead costs effectively and ensure healthy margins per user.
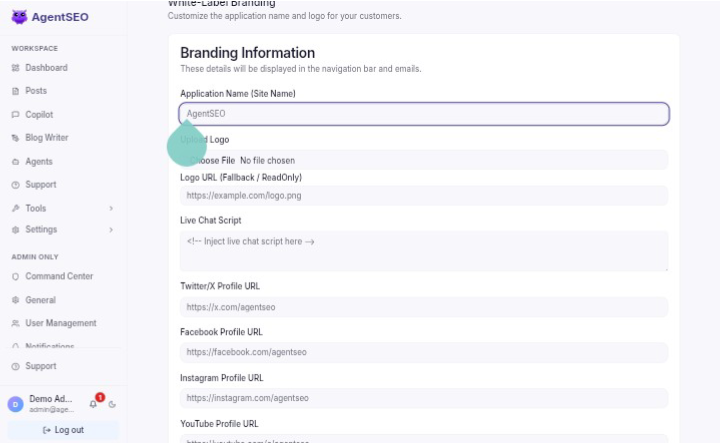
8. Settings: White-Labeling & Branding
Navigate to Settings > Branding to white-label the platform for your tenants.
- Application Name (Site Name): Customize the name displayed throughout the platform.
- Upload Logo: Upload your company logo, which replaces the default branding. Alternatively, set a Logo URL (Fallback / ReadOnly).
- Live Chat Script: Inject a live chat script (like Crisp or Intercom) to support your tenants.
- Social Media Links: Provide your Twitter/X, Facebook, Instagram, and YouTube profile URLs.
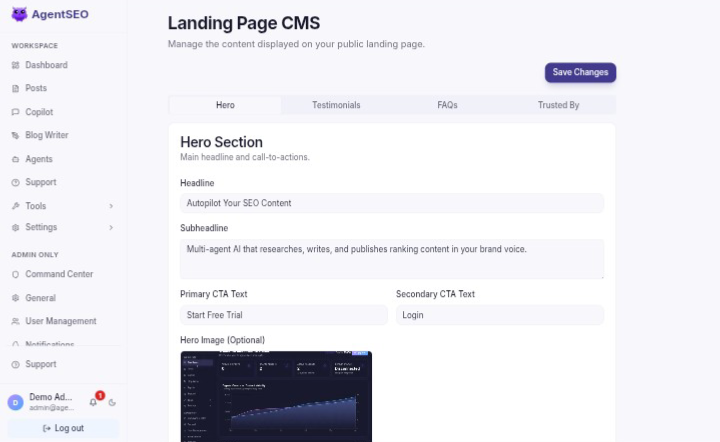
9. Settings: Landing Page CMS
Navigate to Settings > Landing Page CMS. The application features a dynamic, built-in landing page that serves as your SaaS marketing front. As the SaaS Owner, you can edit this page without touching the code.
- Hero Section: Edit the headline, subheadline, and primary/secondary call-to-action buttons.
- Features: Add custom features with Lucide icons to highlight your value proposition.
- Testimonials: Add social proof, upload customer avatars, and highlight success stories.
- FAQs: Answer common customer queries to reduce support requests.
10. Settings: Static Pages CMS
Navigate to Settings > Static Pages CMS. Manage the content of your public static pages seamlessly.
You can author your About Page, Privacy Policy, Terms of Service, and Contact Page using HTML formatting. This eliminates the need for separate landing page builders.

11. Settings: Billing & Gateways
Navigate to Settings > Billing. Here, you can configure how you charge your users and process subscriptions.
Available Payment Gateways:
- Stripe
- Paystack
- Flutterwave
- Razorpay
You must select your active Gateway, set your preferred Currency (e.g., USD, NGN, INR), and enter the respective Public Key, Secret Key, Key ID, or Key Secret. Configuring the Webhook Secret correctly is absolutely essential, as this allows the platform to automatically grant credits to users upon a successful payment.
Gateway Setup & Webhooks
1. Stripe
To configure Stripe:
- Log in to your Stripe Developer Dashboard and navigate to API keys to retrieve your Secret Key.
- Navigate to the Webhooks tab (or Workbench) and click Add endpoint (or Add destination).
- Set your Endpoint URL to:
https://yourdomain.com/api/webhooks/billing/stripe - Select the necessary events (e.g.,
checkout.session.completed,invoice.payment_succeeded) based on your implementation to ensure successful payments trigger credit grants. - After creating the webhook, retrieve your Webhook Secret (starts with
whsec_) and add it to your settings.

2. Paystack
To configure Paystack:
- Log in to your Paystack dashboard and navigate to Settings > API Keys & Webhooks.
- Copy your Secret Key and paste it into AgentSEO settings.
- In the Webhook URL field, enter:
https://yourdomain.com/api/webhooks/billing/paystack - Save the changes. Paystack automatically sends webhook events to this URL.
3. Razorpay
To configure Razorpay:
- Log in to the Razorpay Dashboard and navigate to Accounts & Settings.
- Click on API Keys under "Website and app settings" to obtain your Key ID and Key Secret.
- Navigate to Webhooks (under Accounts & Settings) and click Add New Webhook.
- Set the Webhook URL to:
https://yourdomain.com/api/webhooks/billing/razorpay - Define a secure Secret (Webhook Secret) and add it to both Razorpay and AgentSEO.
- Select the relevant Active Events (e.g.,
subscription.charged,subscription.authenticatedif using subscriptions).
4. Flutterwave
To configure Flutterwave:
- Log in to your Flutterwave dashboard and go to Settings > API Keys to get your Public Key and Secret Key.
- Go to Settings > Webhooks.
- Enter your Webhook URL:
https://yourdomain.com/api/webhooks/billing/flutterwave - Create a secure, random string and enter it in the Secret Hash field. Save this as the Webhook Secret in AgentSEO settings.
- Ensure all necessary event boxes are checked before saving your settings.
Plan Configuration
You can also define your Pro Plan Price, Pro Plan Credits (Monthly), and the Gateway Plan/Price ID from your gateway provider.

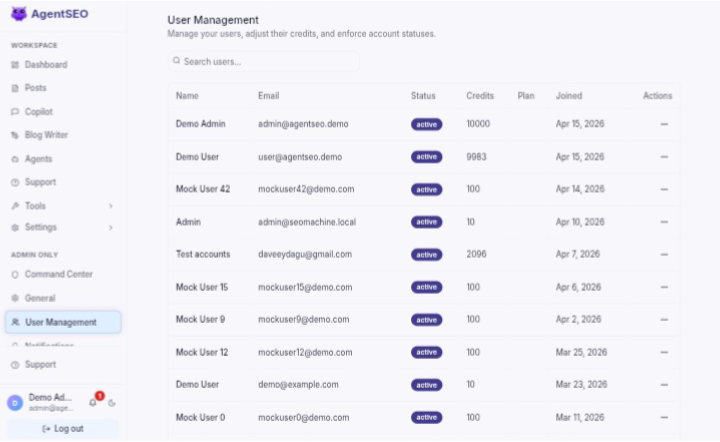
12. Settings: User Management
Navigate to Settings > User Management. This dashboard allows you to oversee all registered tenants on your platform.
Capabilities:
- View Tenants: See all users, their current plan, and their remaining credit balances.
- Adjust Credits: Set the amount, choose an action, and provide a Reason (sent to user) to manually adjust credit balances. This action triggers an automatic email notification to the user detailing the adjustment reason.
- Change Status: You can quickly change a user's Status to Active, Suspended, or Banned and provide a Reason (Optional, sent to user). Banned/Suspended users will be immediately locked out of the platform.
13. Cron Jobs (Background Tasks)
AgentSEO relies on background tasks to process autonomous agents, generate content, and publish schedules. You must set up a cron job on your server to trigger these processes.
Your server needs to make a GET request to the following endpoint every minute:
https://yourdomain.com/api/cron/process-agents
Security Header
To prevent unauthorized triggers, you must pass the CRON_SECRET you defined in your environment variables as an Authorization header: Authorization: Bearer YOUR_CRON_SECRET
Example: Linux crontab (VPS)
Run crontab -e and add the following line:
* * * * * curl -H "Authorization: Bearer YOUR_CRON_SECRET" https://yourdomain.com/api/cron/process-agents >/dev/null 2>&1Tenant & User Guides
Instructions for configuring individual workspaces and AI behavior.
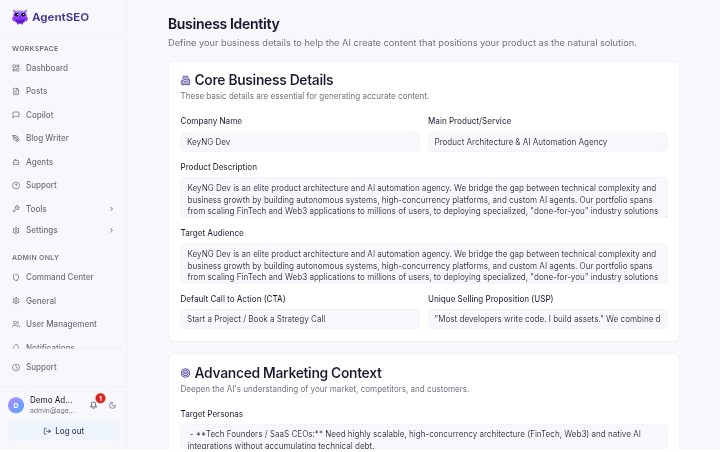
14. Settings: Business Identity
Navigate to Settings > Business Identity to set the foundational knowledge for your AI.
This is where you define your business. The AI uses this context for everything it writes.
- Company Name: Your brand's name.
- Main Product/Service & Product Description: What you sell or offer.
- Target Audience & Target Personas: Who your customers are.
- Default Call to Action (CTA): Your default marketing conversion goal.
- USP (Unique Selling Proposition): What makes you better than competitors.
- Jobs to be Done (JTBD): What 'job' are customers 'hiring' your product to do?
- Common Sales Objections & Direct Competitors: What stops people from buying and who you compete with.
- Customer Language (Verbatim): Exact phrases and terminology your customers use.
- Content Pillars & Target Subreddits: Core themes and subreddits to monitor for trends.
Filling this out ensures the AI writes highly contextual, tailored content rather than generic articles.
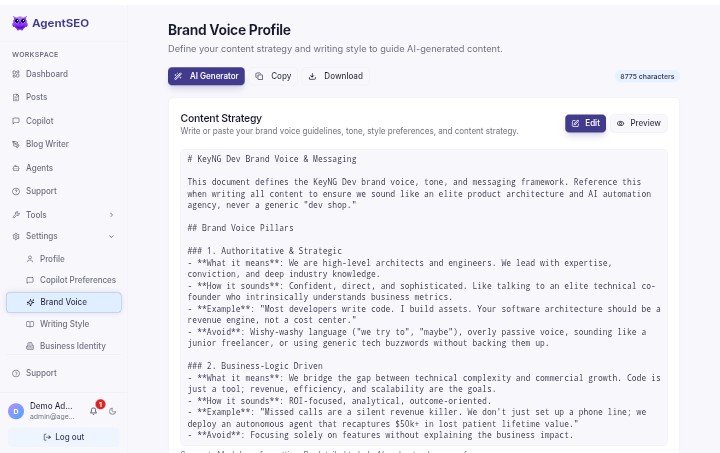
15. Settings: Brand Voice & Writing Style
Navigate to Settings > Brand Voice and Settings > Writing Style to configure how the AI sounds.
Brand Voice Generator
You can use the built-in AI Brand Voice Generator to automatically create a voice profile based on your business identity, or paste a manual markdown strategy if you have specific guidelines.
Writing Style Examples
Upload writing style examples so the AI can learn your exact cadence and tone.
- Paste Text: Paste examples of your best content directly.
- Import URL: Provide a link to an existing blog post or article, and the system will extract the style.
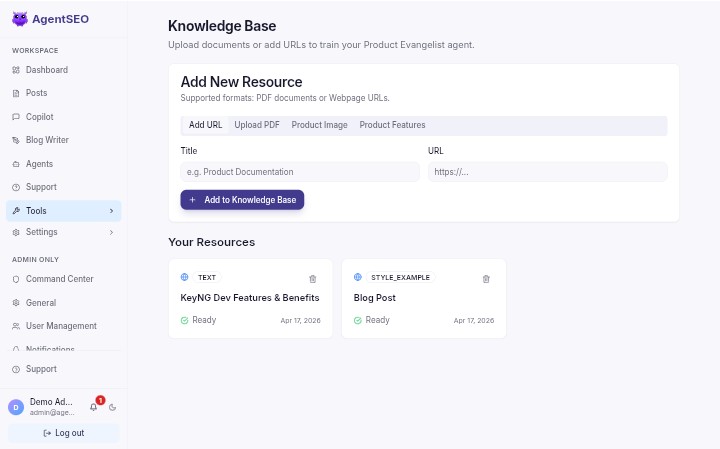
16. Settings: Knowledge Base / RAG
Navigate to Settings > Knowledge Base to provide specific data to your AI.
Product Evangelist Mode
When "Product Evangelist Mode" is active, the AI actively uses the information in your Knowledge Base to promote your products naturally within the generated articles.
Uploading Knowledge
You can train the AI on your specific business data by uploading:
- PDFs: Manuals, brochures, or whitepapers.
- URLs: Links to your website pages or documentation.
- Text: Raw text snippets or FAQs.
- Product Images: Image Files of your products for the AI to reference or include. Include a Title and Content.
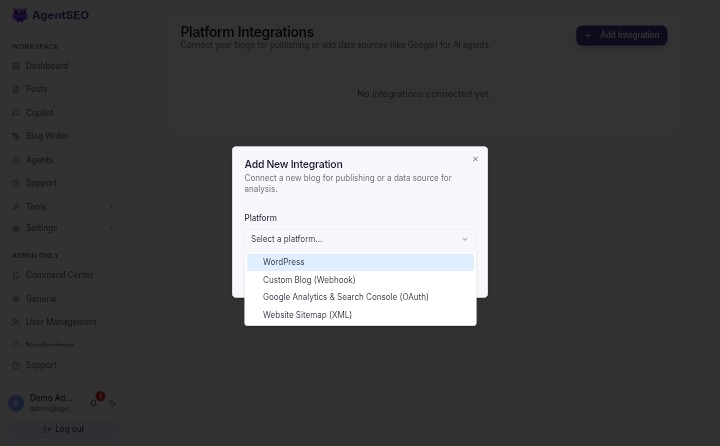
17. Settings: Integrations
Navigate to Settings > Integrations to connect external services like WordPress and Google.
Connecting WordPress
To allow AgentSEO to publish articles directly to your blog, connect your WordPress site.
Creating a WordPress Application Password:
For security, never use your main WordPress admin password. Instead, generate an Application Password.
- Log in to your WordPress admin dashboard.
- Go to Users > Profile (or Edit your specific user profile).
- Scroll down to the Application Passwords section.
- Enter a name for the application (e.g., "AgentSEO") and click Add New Application Password.
- WordPress will generate a secure, 24-character password.
- Copy this password and use it along with your WordPress username in the AgentSEO Integration modal.
Google Analytics 4 (GA4) & Search Console (GSC)
The Performance Agent requires access to Google Analytics 4 and Google Search Console to monitor your site's performance. AgentSEO uses a secure OAuth 2.0 flow.
Step 1: Create a Google Cloud Project
- Go to the Google Cloud Console and sign in.
- Click the project dropdown at the top and select New Project. Name it "AgentSEO Integration".
- Navigate to APIs & Services > Library.
- Search for and Enable both the Google Analytics Data API and the Google Search Console API.
Step 2: Configure OAuth Consent Screen
- Navigate to APIs & Services > OAuth consent screen.
- Select External and click Create.
- Fill in the required App Information (App name, User support email).
- Under Test Users, add the Google email addresses of the users who will be connecting their accounts. (Note: To allow any user without adding them as a tester, you will need to push the app to 'In Production' status later).
Step 3: Create OAuth Credentials
- Navigate to APIs & Services > Credentials.
- Click + CREATE CREDENTIALS and select OAuth client ID.
- Select Web application as the Application type.
- Under Authorized redirect URIs, you MUST add your exact callback URL:
https://yourdomain.com/api/auth/google/callback - Click Create. Copy the generated Client ID and Client Secret.
- Paste these into the Super Admin panel under Settings > AI Brain.
18. How to Use AgentSEO
Once your setup is complete, you can start using AgentSEO to manage your content and SEO.
The Dashboard
The Dashboard is your command center. It provides an overview of:
- Analytics: High-level metrics on your site's performance.
- Recent Posts: Quick access to your latest published or drafted articles.
- Agent Activity Logs: See what your autonomous agents are currently working on in the background.
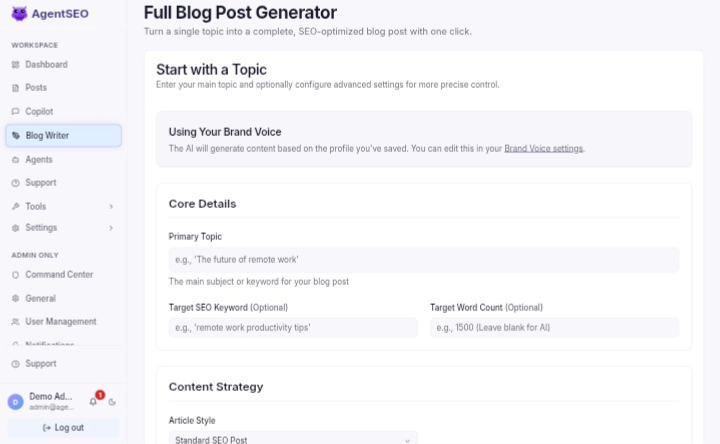
The Blog Writer (/blog-writer)
The Blog Writer allows you to manually initiate a new post generation.
- Generate a Post: Input a topic or keyword to start drafting.
- Product Evangelist Mode: Check this box to ensure the AI weaves your products (from the Knowledge Base) into the article.
- Target Word Count: Specify how long the article should be.
- Revision & Regeneration Dialog: Once a draft is ready, use the dialog to request revisions or regenerate sections until it's perfect.
19. Smart Copilot Setup (WhatsApp & Telegram)
Control your AI agents from your phone by setting up the Smart Copilot under Settings > Smart Copilot.
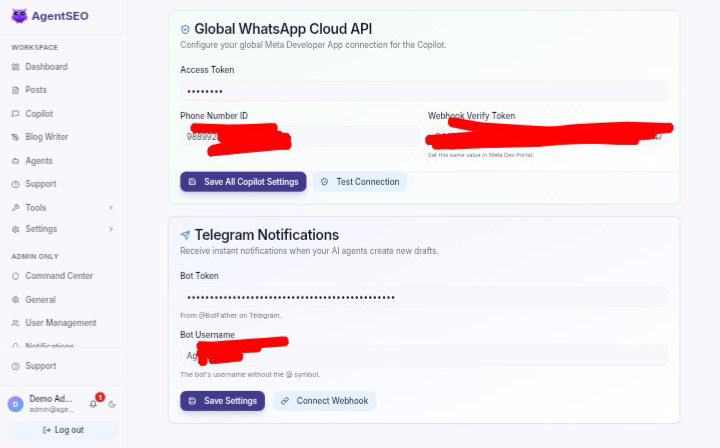
Setting up a Telegram Bot
- Open Telegram and search for @BotFather (the official Telegram bot creator).
- Send the command
/newbot. - Follow the prompts to choose a name and a username (must end in "bot") for your bot.
- BotFather will give you a Bot Token (e.g.,
123456789:ABCdefGhIJKlmNoPQRsTUVwxyZ). - Paste this token into the Telegram configuration in AgentSEO to enable the connection.
Setting up WhatsApp Cloud API
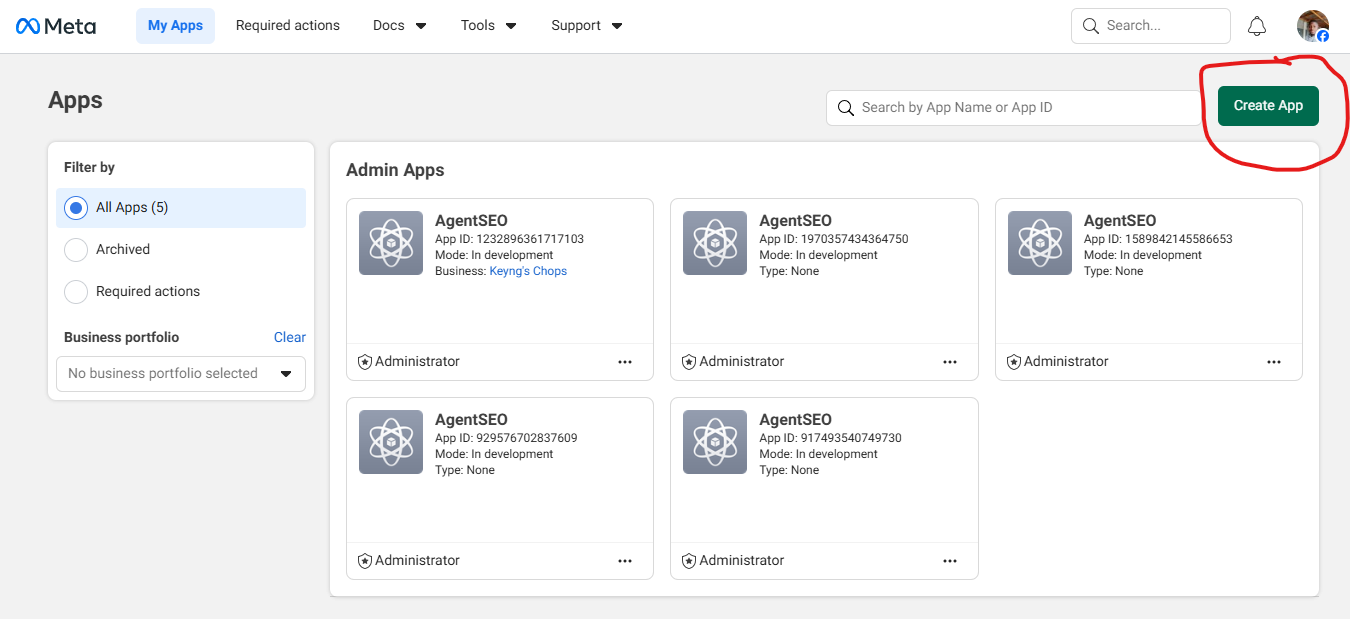
- Go to the Meta for Developers website and log in.
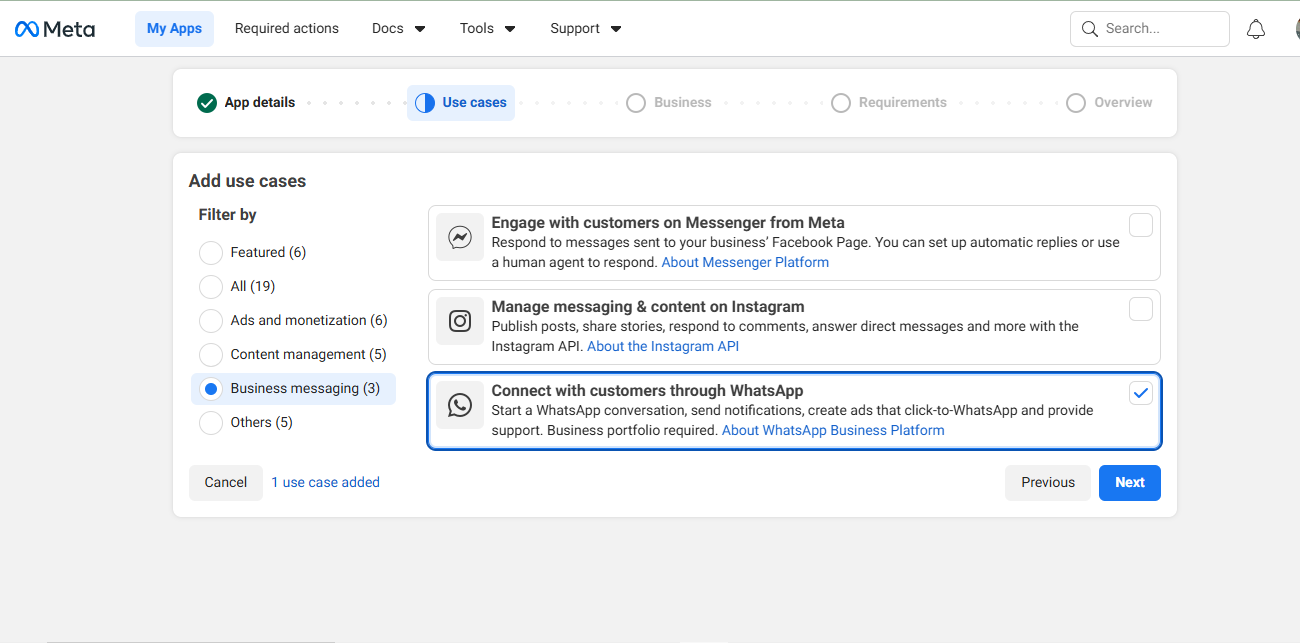
- Click Create App, select Other, click next, select Business, and follow the prompts.
- In the "Add products to your app" screen, find WhatsApp and click Set up.
- Follow the setup to associate a Meta Business Account.
- Navigate to WhatsApp > API Setup in the left sidebar.
- Here you will find your Temporary Access Token (Note: For production, you will need to generate a permanent system token in Business Settings), and your Phone Number ID.
- Important: If using a test number, whitelist your personal phone number in the API Setup page first.
- Paste the Token and Phone Number ID into the Super Admin Settings > Copilot Setup dashboard.
Configuring the WhatsApp Webhook
- In the Meta dashboard, navigate to WhatsApp > Configuration.
- Under Webhook, click Edit.
- Set the Callback URL to:
https://yourdomain.com/api/webhooks/whatsapp - Create a secure, random password and type it into the Verify Token field in Meta.
- Type that exact same password into the Webhook Verify Token field in your AgentSEO Super Admin settings.
- Click Verify and Save in Meta. Finally, click Manage on Webhook fields and subscribe to messages.
20. Autonomous Agents & AI Tools
AgentSEO is powered by an ecosystem of specialized AI agents and tools that work together to manage your content pipeline, from ideation to publishing.
The Autonomous Agents
In the Agents tab (/agents), you can monitor and manage the core workers driving the platform. Each agent serves a distinct purpose in your SEO workflow:
- System Executive Agent: The "manager" agent. It orchestrates all background jobs, assigns tasks to other agents, and ensures the content pipeline runs smoothly without user intervention.
- SEO Analyzer Agent: Continuously monitors your connected integrations (like Google Analytics and Search Console) and your published posts to provide actionable SEO insights and health scores.
- Trend & Ideation Agent: Scours the web (using Reddit and Serper APIs) to identify trending topics in your niche. It automatically populates your "AI Ideas" tab in the content calendar with fresh, relevant concepts.
- Content Drafting Agent: The heavy lifter. It takes topics from your calendar or direct requests, conducts SERP research, forms an outline, and drafts the full article while adhering to your Brand Voice and Knowledge Base.
- Publishing Agent: Handles the final step. It takes "Review Ready" or approved drafts and pushes them to your connected platforms (WordPress or Webhooks) according to your calendar schedule.
- Custom Agents: AgentSEO allows you to create your own custom agents tailored to your specific needs. You can define their trigger conditions, schedules, and custom prompts to automate unique workflows.
